Creating a Multi-Field in AEM
Introduction
In Adobe Experience Manager (AEM), creating a dynamic and author-friendly interface is essential for effective content management. In this guide, we will extend the ‘Profile’ component by adding a multi-field named ‘Hobbies’ to the dialog box. We will also create a Sling Model to facilitate the backend to frontend data flow and explain how to render this data using HTL (formerly known as Sightly).
Step 1: Updating the Dialog to Include ‘Hobbies’ Multi-Field
Open the Dialog XML: Navigate to your AEM project and open the dialog XML for the ‘Profile’ component (usually located under /apps/wknd/components/profile).
Add Multi-Field for Hobbies: Update the XML to include the multi-field. Below is the snippet to add under the <content> node:
<hobbies
	jcr:primaryType="nt:unstructured"
	sling:resourceType="granite/ui/components/coral/foundation/form/multifield"
	fieldLabel="Hobbies"
	>
	<field
		jcr:primaryType="nt:unstructured"
		sling:resourceType="granite/ui/components/coral/foundation/form/textfield"
		name="./hobbies"
		fieldLabel="hobbies"/>
</hobbies>
This code creates a multi-field allowing authors to enter multiple hobbies.
Step 2: Creating a Sling Model for the Profile Component
Create a New Java Class: In your Java source folder (e.g., /src/main/java/com/myproject/models), create a new class ProfileModel.java.
Annotate the Class with @Model:
import org.apache.sling.api.resource.Resource;
import org.apache.sling.models.annotations.Model;
import org.apache.sling.models.annotations.injectorspecific.ChildResource;

import java.util.List;

@Model(adaptables = Resource.class)
public class ProfileModel {

    @ChildResource
    private List<String> hobbies;

    public List<String> getHobbies() {
        return hobbies;
    }
}
- Package Declaration:
package com.adobe.aem.guides.wknd.core.models;– This line declares the package name for the class, following Java’s standard package naming conventions. - Imports: Various classes and annotations from the
org.apache.slingpackage are imported. These are necessary for defining and working with Sling Models in AEM. - @Model Annotation: This annotation defines the class as a Sling Model.
adaptables = Resource.class: Specifies that this model can be adapted from a SlingResource.defaultInjectionStrategy = DefaultInjectionStrategy.OPTIONAL: Sets the default injection strategy to OPTIONAL, meaning if a field cannot be injected, it will be skipped rather than causing an error.
- Class Definition:
public class ProfileModel– This line defines theProfileModelclass. - Field Definition with @ValueMapValue:
@ValueMapValue private List<String> hobbies;: This annotation is used to inject the value of thehobbiesproperty from the underlying resource’s ValueMap. It’s a list of strings.
- Getter Method:
public List<String> getHobbies() { return hobbies; }: This method is a standard Java getter that returns the value of thehobbiesfield.
This model is used in AEM to map properties of a Sling Resource (like a page or a component) to Java objects, making it easier to work with these properties in Java code. The hobbies field will contain data sourced from a corresponding property in the JCR repository.
Step 3: Rendering Hobbies in HTL
- Open the HTL File: Navigate to the HTL file of the ‘Profile’ component (e.g.,
profile.html). - Update the HTL to Render Hobbies:
<img src="${properties.profilePicture}" alt="Profile Picture">
<h2>${properties.candidateName}</h2>
<p>Date of Birth: ${'dd-MM-yyyy' @ format=properties.dateOfBirth}</p>
<p>Engineering Major: ${properties.engineeringMajor}</p>
<p>Gender: ${properties.gender}</p>

<p>Hobbies Listed Below:</p>
<div data-sly-use.profileModel="com.adobe.aem.guides.wknd.core.models.ProfileModel">
    <!-- Existing fields here -->
    <ul data-sly-list.hobby="${profileModel.hobbies}">
        <li>${hobby}</li>
    </ul>
</div>
This HTL script uses the ProfileModel to get the list of hobbies and iterates over them using data-sly-list.
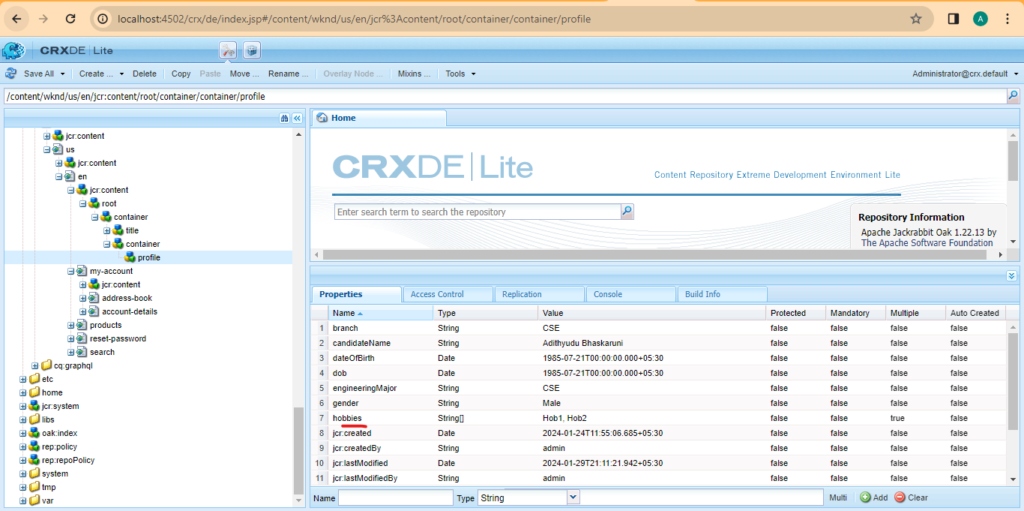
How is it stored in backend?

Testing and Validation:
- Deploy the Changes: Build and deploy your AEM project to your AEM instance.
- Authoring the Component: In the AEM author interface, open a page with the ‘Profile’ component and add hobbies in the dialog.
- Preview the Page: Preview the page to see the hobbies rendered as expected.
By following these steps, you can successfully enhance the ‘Profile’ component with a ‘Hobbies’ multi-field, manage its data through a Sling Model, and render it on the frontend with HTL.
